Ubuntu22.04下安装 Nginx 、 PHP 、 MySQL等服务
分类: Linux 7344 0
基础环境
Ubuntu22.04
安装Nginx
如果不想要最新版的 Nginx,可以直接执行 sudo apt -y install nginx ,
Ubuntu 22.04使用 apt 软件包管理器安装默认的是 nginx1.18 版本。
想用 1.18 版本以上或以下指定版本可用以下方法。
通过apt命令安装指定版本
1.更新Ubuntu系统内的软件包。
sudo apt update2.添加 apt 源文件
将 Nginx 的主线仓库添加到 /etc/apt/sources.list 文件
可以使用tee命令将文本直接写入文件。
# 备份源文件(可选)
sudo cp /etc/apt/sources.list /etc/apt/sources.list.bak
# 编辑源文件
# 可以使用tee命令将文本直接写入文件
# 这里使用了 tee -a 命令,其中 -a 参数表示将内容追加到文件末尾,而不是覆盖现有文件。
# 添加二进制包仓库:
echo "deb http://nginx.org/packages/mainline/ubuntu/ jammy nginx" | sudo tee -a /etc/apt/sources.list

# 添加源代码仓库
echo "deb-src http://nginx.org/packages/mainline/ubuntu/ jammy nginx" | sudo tee -a /etc/apt/sources.list
说明:服务器Ubuntu版本是Ubuntu22.04(LTS)版的,所以系统代号是:jammy
如果要查看系统代号,使用命令 lsb_release -c 或者 lsb_release -cs
root@chixm: # lsb_release -c
Codename:       jammy

root@chixm: # lsb_release -cs
jammy
3.导入nginx公钥
因为在 Ubuntu 22.04 上导入 Nginx 官方公钥时,使用apt-key导入秘钥,会警告apt-key 命令已经不再被推荐使用。
所以可以使用gpg命令和相关的目录来管理密钥。
下载 Nginx 公钥: 可以使用 curl 或 wget 来下载公钥文件。
## 使用 curl
curl https://nginx.org/keys/nginx_signing.key | gpg --dearmor > nginx.gpg

## 使用 wget
wget https://nginx.org/keys/nginx_signing.key -O - | gpg --dearmor > nginx.gpg
再将公钥导入到 APT 密钥环
sudo install -o root -g root -m 644 nginx.gpg /etc/apt/trusted.gpg.d/最后,更新软件包列表以确保 APT 包管理器使用新的公钥。
sudo apt update4.安装Nginx。
# 查看可安装的 nginx 版本
sudo apt-cache show nginx

#安装nginx 1.25.1
sudo apt-get install nginx=1.25.0-1~jammy

# 查看Nginx版本
sudo nginx -v
5.然后启动nginx
sudo systemctl start nginx
如果有如下报错的话:
Job for nginx.service failed because the control process exited with error code.
See "systemctl status nginx.service" and "journalctl -xeu nginx.service" for details.
多半是内置的Apache抢占了nginx的端口,执行以下命令:
sudo systemctl stop apache2.service
sudo systemctl restart nginx
6.nginx 部分配置与命令
使用systemctl命令控制服务:
设置开机启动: sudo systemctl enable nginx
启动nginx:sudo systemctl start nginx
停止nginx:sudo systemctl stop nginx
重启nginx:sudo systemctl restart nginx
查看状态:sudo systemctl status nginx
配置路径:
nginx 配置文件目录: /etc/nginx ;
配置文件:/etc/nginx/conf.d/default.conf;
默认存放网站的目录:/usr/share/nginx/html,如果需要更改目录修改配置文件的内容即可
安装 PHP
以下是安装不同版本的 PHP 和 一些常用扩展的方法步骤。
php7.4
使用的版本是7.4,就以这个版本操作。
1.首先需要安装PHP的仓库:
sudo apt install software-properties-common2.然后添加ondrej/php存储库,它提供了多个PHP版本:
sudo add-apt-repository ppa:ondrej/php出现 Press [ENTER] to continue or Ctrl-c to cancel. 时按回车继续。
注意:(ondrej/php)是第三方仓库,可能会带来一些风险,因为它不是Ubuntu官方维护的。如果介意,请安装 ubuntu 提供的默认版本 。
3.再次更新安装包:
sudo apt update4.然后就可以直接安装php7.4了!
sudo apt install php7.4

# 这里如果需要php7.4-fpm服务,也可以直接用以下命令去安装,
# 该指令会直接安装包含 php 在内的 php7.4 和 php7.4-fpm
sudo apt install php7.4-fpm -y
5.安装PHP扩展(可以根据需要删减需要的)。
PHP 扩展的安装通常是以 php 开头,接着是版本号,然后是-和扩展名称。格式php7.4-[extname]。
并不是所有 php 扩展都可以通过 apt 命令进行安装,Apt 仓库仅提供常用 PHP 扩展,某些扩展可能需要自己手动编译。
sudo apt install -y php7.4-common php7.4-mysql php7.4-xml php7.4-xmlrpc php7.4-curl php7.4-gd php7.4-imagick php7.4-cli php7.4-dev php7.4-imap php7.4-mbstring php7.4-opcache php7.4-soap php7.4-zip6.安装 php-fpm
## 安装 PHP-FPM
sudo apt install php7.4-fpm
在安装PHP扩展之后,重启PHP-FPM服务,否则新的PHP扩展不会加载到PHP-FPM。运行命令 sudo systemctl restart php7.4-fpm。
使用systemctl命令控制服务:
启动服务 sudo systemctl start php7.4-fpm
开机自启动 sudo systemctl enable php7.4-fpm
检查 PHP-FPM 服务状态 sudo systemctl status php7.4-fpm
重新启动 sudo systemctl restart php7.4-fpm
7.创建文件验证PHP安装
echo '<?php phpinfo(); ?>' | sudo tee /usr/share/nginx/html/info.phpphpinfo()函数会展示PHP的所有配置信息,然后写入到了info.php。(测试完记得删除)
再修改 nginx 配置文件以支持PHP,/etc/nginx/conf.d/default.conf
server {
  listen 80;
  server_name localhost;
  # 网站根目录
  root /usr/share/nginx/html;

  location / {
    index index.php index.html index.htm;
    try_files $uri $uri/ /index.php?q=$uri&$args;
  }

  location ~ \.php$ {
    try_files $uri =404;
    include fastcgi_params;
    fastcgi_pass 127.0.0.1:9000;
    fastcgi_param SCRIPT_FILENAME $document_root$fastcgi_script_name;
  }
}修改Nginx配置文件后可以运行nginx -t命令测试Nginx配置的语法是否正确。
如果没有错误nginx会提示nginx: configuration file /etc/nginx/nginx.conf test is successful。
测试Nginx配置正确之后重启服务 sudo systemctl restart nginx
注意:
如果出现502 Bad Gateway。
检查 PHP-FPM 的配置文件(路径通常位于 /etc/php/7.4/fpm/pool.d/www.conf ),确认 listen 指令是否正确设置为监听端口9000
详细修改信息可以看文章 迁移博客遇到的几个问题 下的验证PHP安装提示 502
再次访问应该就能看到展示PHP的所有配置信息了。

PHP8.1
Ubuntu 22.04 使用 apt 软件包管理器安装默认的是 PHP 8.1 版本。
1.运行以下命令,安装PHP。
sudo apt -y install php-fpm2.安装常用PHP扩展(例如:curl、gd、mbstring、mysql、xml、zip等):
sudo apt install php-curl php-gd php-mbstring php-mysql php-xml php-zip3.修改Nginx配置文件以支持PHP。
此步骤参考上文PHP7.4的安装步骤第7小节,创建文件验证PHP安装。
使用systemctl命令控制服务:
启动服务 sudo systemctl start php8.1-fpm
开机自启动 sudo systemctl enable php8.1-fpm
检查 PHP-FPM 服务状态 sudo systemctl status php8.1-fpm
重新启动 sudo systemctl restart php8.1fpm
PHP8.2
在 Ubuntu 20.04 安装 PHP 8.2 和上文安装 php7.4 一样。
需要做的就是启用 ondrej/php 存储库,并使用 apt 安装 PHP 8.2。
sudo apt install software-properties-common
sudo add-apt-repository ppa:ondrej/php

sudo apt update
sudo apt install php8.2-fpm
PHP 扩展的安装通常是以 php 开头,接着是版本号,然后是-和扩展名称。格式php8.2-[extname]。
并不是所有php扩展都可以通过apt命令进行安装,Apt仓库仅提供常用PHP扩展,某些扩展可能需要自己手动编译。
例如,要安装MySQL和GD扩展,您可以运行命令sudo apt install php8.2-mysql php8.2-gd。
sudo apt update
sudo apt install php8.2-mysql php8.2-gd -y
sudo systemctl restart php8.2-fpm
sudo systemctl status php8.2-fpm
安装MySQL
安装MySQL8.0
#
sudo apt -y install mysql-server

#查看MySQL版本
mysql -V
配置MySQL
进入MySQL
sudo mysql设置root用户密码
ALTER USER 'root'@'localhost' IDENTIFIED WITH mysql_native_password by 'mynewpassword';

## 密码以Mysql.1234为例
ALTER USER 'root'@'localhost' IDENTIFIED WITH mysql_native_password by 'Mysql.1234';

## 退出MySQL数据库
exit;
对MySQL进行安全性配置
sudo mysql_secure_installation输入root用户的密码。本示例中输入Mysql.1234
$ sudo mysql_secure_installation

Securing the MySQL server deployment.

Enter password for user root:
配置说明(Yes | No 根据需要自行选择):
输入Y,设置密码验证策略
VALIDATE PASSWORD COMPONENT can be used to test passwords
and improve security. It checks the strength of password
and allows the users to set only those passwords which are
secure enough. Would you like to setup VALIDATE PASSWORD component?

Press y|Y for Yes, any other key for No: Y
根据提示,选择密码验证策略。本示例输入2
Please enter 0 = LOW, 1 = MEDIUM and 2 = STRONG: 2输入Y,更改root用户密码。(根据需要,也可以不改)
Change the password for root ? ((Press y|Y for Yes, any other key for No) : Y输入root用户密码。(如果跳过了上一步,这一步也不会出现)
New password:

Re-enter new password:

Estimated strength of the password:
输入Y,确认使用已设置的密码
Do you wish to continue with the password provided?(Press y|Y for Yes, any other key for No) : Y输入Y删除MySQL自带的匿名用户
By default, a MySQL installation has an anonymous user,
allowing anyone to log into MySQL without having to have
a user account created for them. This is intended only for
testing, and to make the installation go a bit smoother.
You should remove them before moving into a production
environment.

Remove anonymous users? (Press y|Y for Yes, any other key for No) : Y
输入Y,禁止MySQL的root用户的远程登录权限。后面也可修改
Normally, root should only be allowed to connect from
'localhost'. This ensures that someone cannot guess at
the root password from the network.

Disallow root login remotely? (Press y|Y for Yes, any other key for No) : Y
输入Y,移除test数据库。
By default, MySQL comes with a database named 'test' that
anyone can access. This is also intended only for testing,
and should be removed before moving into a production
environment.

Remove test database and access to it? (Press y|Y for Yes, any other key for No) :
输入Y,重新加载授权表。
Reloading the privilege tables will ensure that all changes
made so far will take effect immediately.

Reload privilege tables now? (Press y|Y for Yes, any other key for No) : Y
当命令行回显All done!时,表示配置完成。
测试登录MySQL数据库。
## 登录MySQL数据库
sudo mysql -uroot -p
安装MySQL5.7
进入MySQL官方的Community Server选择历史版本:https://downloads.mysql.com/archives/community/
1.下载tar包
可以使用wget命令链接下载地址,也可以使用腾讯云提供的文件上传,将tar包放在Ubuntu的一个目录中
wget https://downloads.mysql.com/archives/get/p/23/file/mysql-server_5.7.42-1ubuntu18.04_amd64.deb-bundle.tar在目录下解压tar包
tar xvf mysql-server_5.7.42-1ubuntu18.04_amd64.deb-bundle.tar2.安装
安装依赖lib包
sudo apt-get install ./libmysql*
sudo apt-get install libtinfo5
安装客户端和服务端,按提示可能要先安装community版本
sudo apt-get install ./mysql-community-client_5.7.42-1ubuntu18.04_amd64.deb
sudo apt-get install ./mysql-client_5.7.42-1ubuntu18.04_amd64.deb

#此步需要输入数据的root密码
sudo apt-get install ./mysql-community-server_5.7.42-1ubuntu18.04_amd64.deb

sudo apt-get install ./mysql-server_5.7.42-1ubuntu18.04_amd64.deb
过程中会提示设置MySQL的密码,用户名默认root

3.启动MySQL
对MySQL进行安全性配置
配置说明见上文8.0部分
sudo mysql_secure_installation检查mysql服务状态
systemctl status mysql.service出现下面界面说明安装成功
root@chixm: ~# systemctl status mysql.service
● mysql.service - MySQL Community Server
     Loaded: loaded (/lib/systemd/system/mysql.service; enabled; vendor preset: enabled)
     Active: active (running) since Sun 2024-04-22 00:48:15 CST; 40s ago
    Process: 18203 ExecStartPre=/usr/share/mysql/mysql-systemd-start pre (code=exited, status=0/SUCCESS)
    Process: 18242 ExecStart=/usr/sbin/mysqld --daemonize --pid-file=/var/run/mysqld/mysqld.pid (code=exited, status=0/SUCC>
   Main PID: 18244 (mysqld)
      Tasks: 27 (limit: 1939)
     Memory: 170.5M
        CPU: 312ms
     CGroup: /system.slice/mysql.service
             └─18244 /usr/sbin/mysqld --daemonize --pid-file=/var/run/mysqld/mysqld.pid

Apr 21 00:48:14 iZ7xv436kce53s2t1abuavZ systemd[1]: Starting MySQL Community Server...
Apr 21 00:48:15 iZ7xv436kce53s2t1abuavZ systemd[1]: Started MySQL Community Server.
至此MySQL5.7.42已经安装成功。
登录MySQL
mysql -u root -p如果不想使用终端管理 mysql,也可以使用图形界面 phpMyAdmin
安装 phpMyAdmin Nginx
当前phpMyAdmin稳定版本5.2.1。这里在Nginx的根目录安装phpMyAdmin。
切换Nginx的默认根目录。
cd /usr/share/nginx/html下载phpMyAdmin。
wget https://files.phpmyadmin.net/phpMyAdmin/5.2.1/phpMyAdmin-5.2.1-all-languages.zip下载完成运行unzip命令解压缩phpMyAdmin源码。
sudo unzip phpMyAdmin-5.2.1-all-languages.zip重命名一下目录,配置时简短一点
mv phpMyAdmin-5.2.1-all-languages phpmyadmin配置Nginx PhpMyAdmin
配置Nginx运行phpMyAdmin。
方法一:是使用Nginx的location来运行phpMyAdmin。
Nginx配置文件/etc/nginx/conf.d/default.conf
server {
    listen 80;
    listen 443 ssl http2;
    server_name xm.moshanghua.net;
    root /usr/share/nginx/html;

    location / {
        index index.php index.html index.htm;
        try_files $uri$uri/ /index.php?q=$uri&$args;
    }

    location /phpmyadmin/ {
        alias /usr/share/nginx/html/phpmyadmin/;# 注意末尾的斜杠
        index index.php index.html index.htm;
        try_files $uri $uri/ /phpmyadmin/index.php$is_args$args;
    }

    location ~ \.php$ {
        try_files $uri =404;
        include fastcgi_params;
        fastcgi_pass 127.0.0.1:9000;
        fastcgi_param SCRIPT_FILENAME $document_root$fastcgi_script_name;
    }
    # 不想启用 HTTPS 就注释或者删除下面这段配置,上面的 listen 443 也注释掉
    # 引入证书文件开始
    ssl_certificate   /etc/nginx/ssl/xm.moshanghua.net.pem; #指定SSL证书文件路径。
    ssl_certificate_key  /etc/nginx/ssl/xm.moshanghua.net.key; # 指定SSL证书密钥文件路径。
    ssl_session_timeout 5m;
    ssl_ciphers ECDHE-RSA-AES128-GCM-SHA256:ECDHE:ECDH:AES:HIGH:!NULL:!aNULL:!MD5:!ADH:!RC4;
    ssl_protocols TLSv1.3 TLSv1.2 TLSv1.1;
    ssl_prefer_server_ciphers on;
    # 引入证书文件结束
}修改配置后,nginx -t命令测试Nginx配置的语法
sudo systemctl restart nginx使nginx配置文件生效
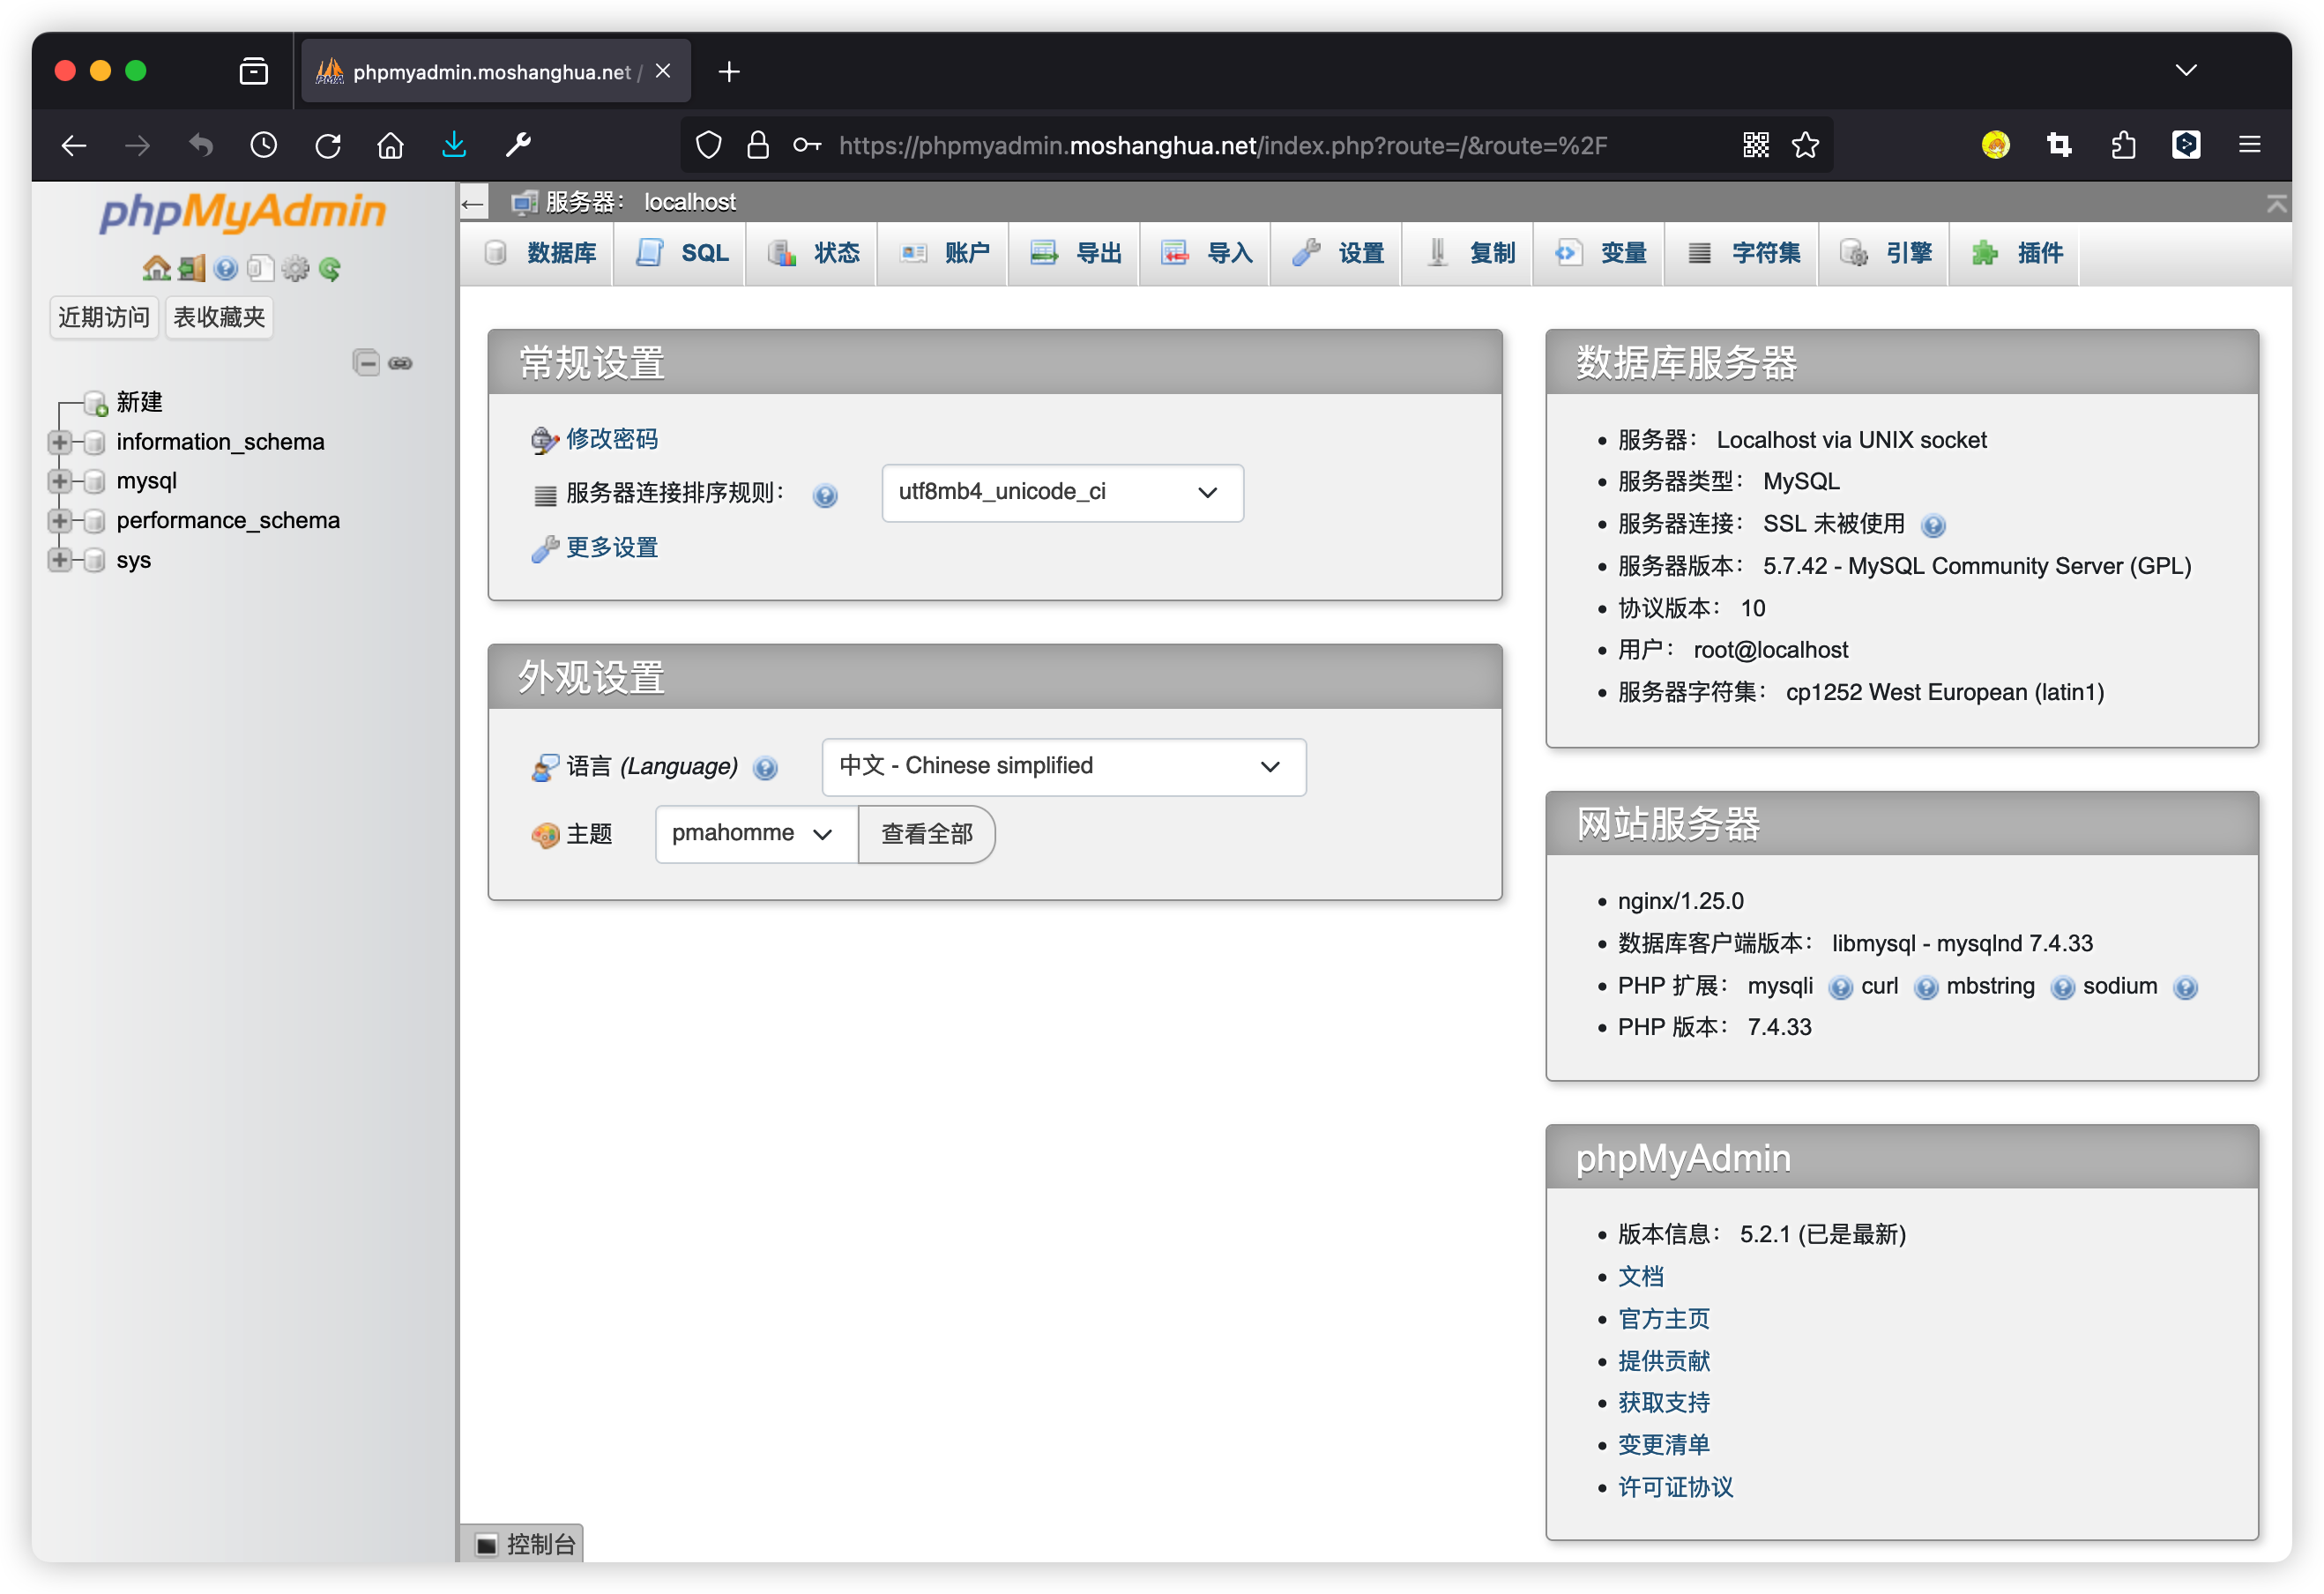
要访问phpMyAdmin界面,输入URLhttps://xm.moshanghua.net/phpmyadmin/index.php

在用户名字段中输入前面安装的数据库的用户名root或者设置名称,在密码字段中输入数据库的密码。
然后登录后,就能看到phpMyAdmin面板。

方法二:配置Nginx的Server块,通过独立子域名来运phpMyAdmin。
另外创建一个Nginx的Server块并配置独立的子域名。
server {
    listen 80;
    listen 443 ssl http2;
    server_name phpmyadmin.moshanghua.net;
    root /usr/share/nginx/html/phpmyadmin;
    index index.php index.html index.htm;

    location ~ \.php$ {
        try_files $uri =404;
        include fastcgi_params;
        fastcgi_pass 127.0.0.1:9000;
        fastcgi_param SCRIPT_FILENAME $document_root$fastcgi_script_name;
    }

    # 引入证书文件开始
    ssl_certificate   /etc/nginx/ssl/phpmyadmin.moshanghua.net.pem; #指定SSL证书文件路径。
    ssl_certificate_key  /etc/nginx/ssl/phpmyadmin.moshanghua.net.key; # 指定SSL证书密钥文件路径。
    ssl_session_timeout 5m;
    ssl_ciphers ECDHE-RSA-AES128-GCM-SHA256:ECDHE:ECDH:AES:HIGH:!NULL:!aNULL:!MD5:!ADH:!RC4;
    ssl_protocols TLSv1.3 TLSv1.2 TLSv1.1;
    ssl_prefer_server_ciphers on;
    # 引入证书文件结束

}修改配置后,nginx -t命令测试Nginx配置的语法
sudo systemctl restart nginx使nginx配置文件生效
要访问phpMyAdmin界面,输入URLhttps://phpmyadmin.moshanghua.net/index.php

在用户名字段中输入前面安装的数据库的用户名root或者设置名称,在密码字段中输入数据库的密码。
然后登录后,就能看到phpMyAdmin面板。
几处配置

创建临时目录
变量 $cfg['TempDir'] (/usr/share/nginx/html/phpmyadmin/tmp/)无法访问。phpMyAdmin无法缓存模板文件,所以会运行缓慢。
解决此问题:
1.确保临时目录存在:
检查 phpmyadmin/ 目录下是否存在/tmp目录,如果不存在,需要创建它:
sudo mkdir -p phpmyadmin/tmp
确保 Nginx 用户(通常是 www-data)有权限读写该临时目录。
sudo chown www-data:www-data phpmyadmin/tmp
sudo chmod 700 phpmyadmin/tmp2.配置 phpMyAdmin:
复制 phpMyAdmin 目录下的示例配置文件并且重命名为config.inc.php来配置 phpMyAdmin,直接新建空白config.inc.php文件也可以。
sudo cp phpmyadmin/config.sample.inc.php phpmyadmin/config.inc.php需要在 phpMyAdmin 的配置文件 config.inc.php 末尾添加设置 $cfg['TempDir']。
文件路径根据存放位置来写,本文存放在/usr/share/nginx/html/
# 打开文件
sudo vim phpmyadmin/config.inc.php

# 末尾添加
$cfg['TempDir'] = '/usr/share/nginx/html/phpmyadmin/tmp';
3.重启 Nginx 和 PHP-FPM:
保存配置文件的更改,并重启 Nginx 和 PHP-FPM 以确保更改生效:
sudo systemctl restart nginx

# 对应自己安装的版本
sudo systemctl restart php7.4-fpm
设置一个 短语密码
从 phpMyAdmin 4.0.0 版本开始,config.inc.php 配置文件支持使用短语密码(也称为“密码短语”或“passphrase”)来加密存储在配置中的敏感数据,如 blowfish_secret。
设置 blowfish_secret 的步骤:
1.生成加密密钥:
生成一个随机的加密密钥:
1.使用密码生成器成一个随机的密码短语。
随机密码生成器
Random Password Generator
2.使用命令行工具,如 openssl:openssl rand -base64 24
root@chixm:~# openssl rand -base64 24
Gt1jl6WQJy5HoUQcHp4+I0Y7Qfnfd+eu
这将生成一个 24 字节的随机字符串,以 Base64 编码。
2.编辑配置文件:
将生成的加密密钥添加到您的 config.inc.php 文件中,设置 blowfish_secret:
$cfg['blowfish_secret'] = '你生成的随机密码短语';
# 打开编辑器
sudo vim phpmyadmin/config.inc.php

#添加一下配置到文件末尾
$cfg['blowfish_secret'] = 'Gt1jl6WQJy5HoUQcHp4+I0Y7Qfnfd+eu'; // 可以是任何随机字符串
3.重启 Nginx 和 PHP-FPM:
保存配置文件的更改,并重启 Nginx 和 PHP-FPM 以确保更改生效:
sudo systemctl restart nginx

# 对应自己安装的版本
sudo systemctl restart php7.4-fpm
配置数据库 phpMyAdmin
报错下图信息是因为phpMyAdmin 需要数据库表。

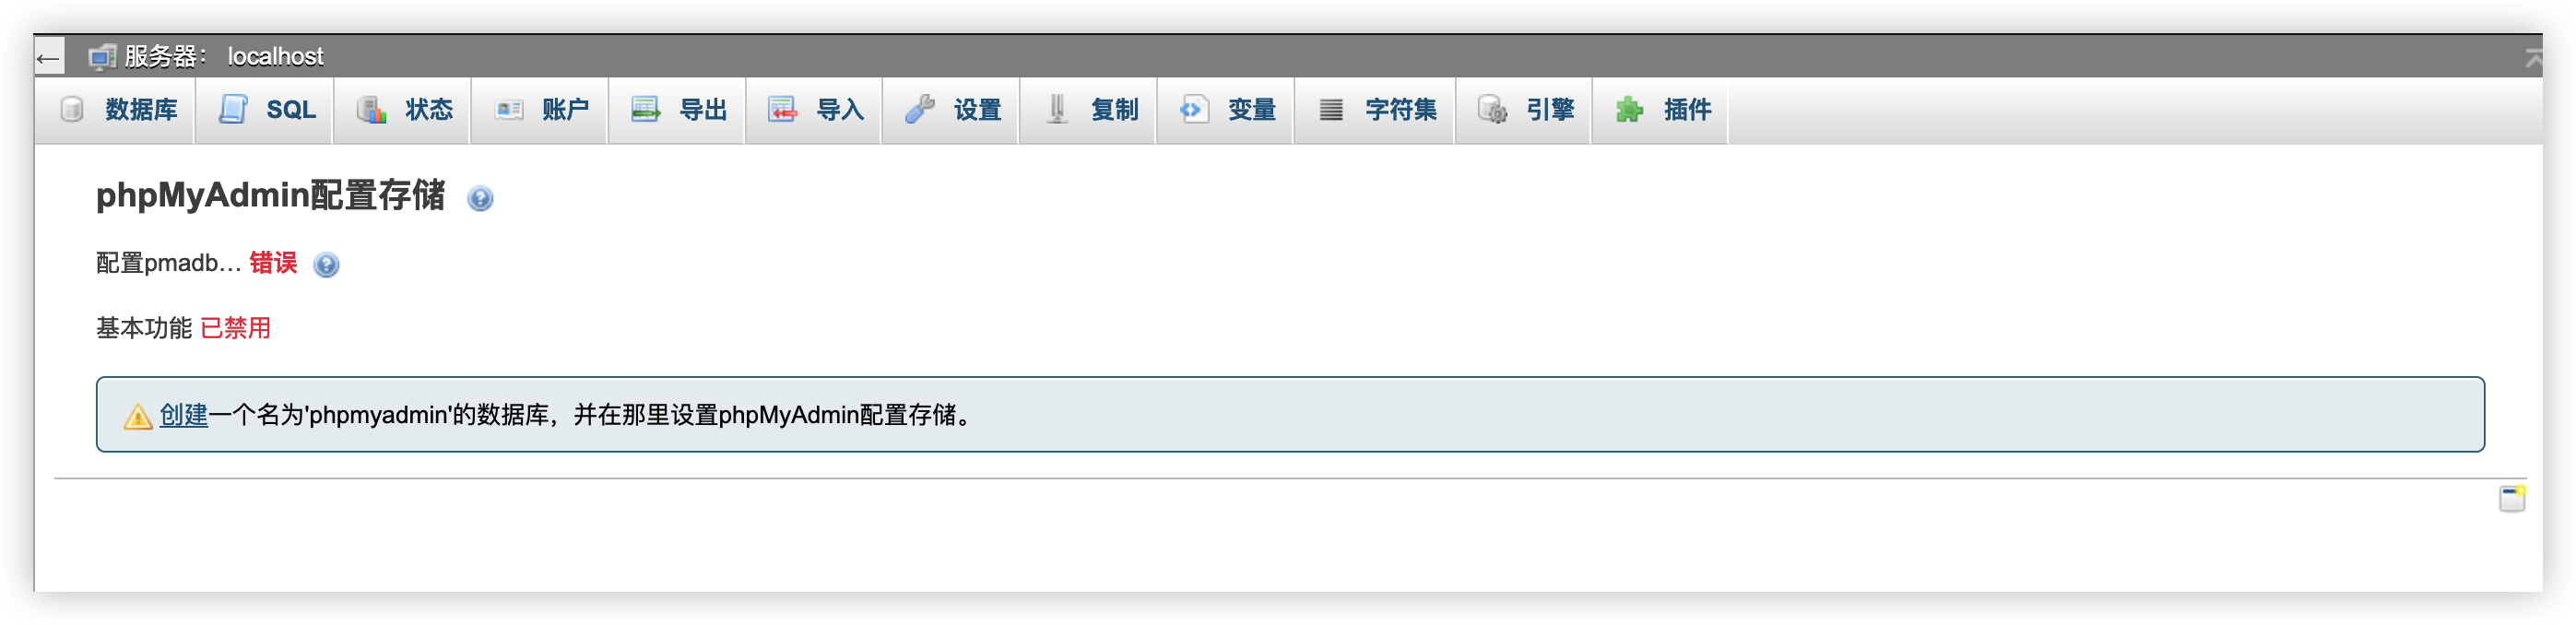
所以,要导入自带的 phpMyAdmin 归档包 create_tables.sql 来为 phpMyAdmin 创建表。
使用 MySQL 客户端或 phpMyAdmin 登录到数据库服务器,创建数据库 phpmyadmin,并导入create_tables.sql的数据。
使用 MySQL 导入演示:
登录
mysql -u root -p创建数据库 phpmyadmin
CREATE DATABASE phpmyadmin;选择数据库,然后导入目录 phpMyAdmin/sql下的 create_tables.sql 这个库。
# 选择数据库
USE phpmyadmin;

# 导入数据
SOURCE /usr/share/nginx/html/phpmyadmin/sql/create_tables.sql;
完整步骤:
root@chixm:~ # mysql -u root -p

mysql> CREATE DATABASE phpmyadmin;
Query OK, 1 row affected (0.00 sec)

mysql> USE phpmyadmin;
Database changed
mysql> SOURCE /usr/share/nginx/html/phpmyadmin/sql/create_tables.sql;
Query OK, 1 row affected, 1 warning (0.00 sec)

Database changed
Query OK, 0 rows affected (0.01 sec)

Query OK, 0 rows affected (0.02 sec)

...

mysql>
这时再刷新就没有错误提示了。

安装部署Node.js环境
演示版本v16.17.0,更多版本访问官网 Node.js
使用NVM安装管理多个Node.js版本
NVM(Node Version Manager)是Node.js的版本管理软件,可以轻松在Node.js各个版本间进行切换。
以下是简单的安装使用,更多信息可以前往 NVM 的 Github仓库进行查看
安装 NVM
使用 cURL 或 Wget 命令:
curl -o- https://raw.githubusercontent.com/nvm-sh/nvm/v0.39.7/install.sh | bashwget -qO- https://raw.githubusercontent.com/nvm-sh/nvm/v0.39.7/install.sh | bash运行以下命令以加载 NVM 环境
export NVM_DIR="$([ -z "${XDG_CONFIG_HOME-}" ] && printf %s "${HOME}/.nvm" || printf %s "${XDG_CONFIG_HOME}/nvm")"
[ -s "$NVM_DIR/nvm.sh" ] && \. "$NVM_DIR/nvm.sh"
验证 NVM 是否安装成功
nvm --version使用 NVM 管理 Node.js 版本
查看可用的 Node.js 版本
通过以下命令查看所有可用的 Node.js 版本:
nvm ls-remote安装特定版本的 Node.js
例如,要安装最新的 LTS 版本:
nvm install --lts要安装其他特定版本,例如 v16.17.0 版本:
nvm install 16.17.0查看已安装的 Node.js 版本
使用以下命令查看系统中已安装的所有 Node.js 版本:
nvm ls切换 Node.js 版本
要切换到特定版本的 Node.js,例如切换到 v16.17.0 版本:
nvm use 16.17.0设置默认 Node.js 版本
要将某个版本设置为默认版本,例如设置 v16.17.0 为默认版本:
nvm alias default 16.17.0卸载 Node.js 版本
要卸载某个版本的 Node.js,例如卸载 v16.17.0 版本:
nvm uninstall 16.17.0使用 Node.js 和 npm
使用以下命令来查看当前使用的 Node.js 和 npm 版本:
node -v
npm -v
使用二进制文件安装
该方式使用的安装包是已编译好的二进制文件。解压文件之后,在bin文件夹中就已存在node和npm,无需重复编译。
如果需要将该软件安装到其他目录下,又不想后期移动,可以先进入其目录下执行下载解压命令
本文以安装Node.js v16.0.0版本为例,且文件放在根目录下。
具体操作说明如下:
# 进入根目录
cd ~

pwd
/root
下载Node.js安装包。
wget https://nodejs.org/dist/v16.17.0/node-v16.17.0-linux-x64.tar.xz解压Node.js安装包
tar xvf node-v16.17.0-linux-x64.tar.xz创建node和npm的软链接。
创建软链接后,您可以在任意目录下直接使用node和npm命令。
ln -s /root/node-v16.17.0-linux-x64/bin/node /usr/local/bin/node
ln -s /root/node-v16.17.0-linux-x64/bin/npm /usr/local/bin/npm
至此,Node.js环境已安装完毕。软件默认安装在/root/node-v16.0.0-linux-x64/目录下。
参考文章 、资料
Kimi.ai
ubuntu 18.04 apt 升级 nginx 1.14 到 nginx 1.21.0
手动部署LNMP环境(Ubuntu)
服务器Ubuntu Server 22.04安装低版本MySQL5.7
https://cumi.co/20221006/
如何在Ubuntu 22.04安装 phpMyAdmin Nginx

共 0 条评论关于 “Ubuntu22.04下安装 Nginx 、 PHP 、 MySQL等服务”